The Nine Expressions Every Pin-Up Artist Should Know

This was supposed to be a post about Bettie Page.
The Undisputed “Queen Of The Pin-Ups”, a legendary figure in the industry, a woman whose every pin-up seems to POP off the page-
For the last month in my art study, I had been trying to reverse engineer WHY every Bettie Page pin-up seems to ‘pop’ off the page more than anyone else from her era (or since!), and how I could replicate even a little of that, in my artwork!
And I think I’ve distilled what made Bettie so special down to three big elements:
She was never ashamed of her sexuality (rare for the era!) and always seemed happy to be there
She was athletic for the time, and her waist was INSANELY small compared to her ribs (probably good poses and sucking in right before the photo was taken)
Her expressions were always the purest distillation of the emotion the shot required, and would be understandable even to a CAVEMAN
And while all three points were interesting to me, the one I guessed MOST pin-up artists could use MOST OFTEN was #3- making your pin-up expressions so PRIMAL they could turn even a caveman on.
Expressions are tricky, as you’ll see, and even just lengthening the line of a mouth a little can totally change what one means. It’s simultaneously the hardest AND the easiest thing to do in pinups. So let’s learn from the best to have ever done it.
(FYI, if you want to learn more about Bettie’s amazing life and where she got those bangs, go here: https://www.bettiepage.com or just Bing her I guess.)
Let’s get into it.
WARNING: FROM THIS POINT ON THERE WILL BE BOOBIES.
It’s just something we have to suffer through, as pin-up artists.
STEP 1: INSPIRATION AND ROUGH SKETCHING
There are a million great Bettie Page shots out there (and I recommend you copy/study/imitate some if you’re ever feeling stuck in your pin-up practice!) so I tried a few out, to get inspiration for this piece (and remember I show you these to prove to young artists that no one gets it perfect on the first try, so you’re probably doing better than you think!):

Look at that HAPPY expression she has, with her nose cutely scrunched up and her eyes just little upside down half moons- it’s primal and RAW and FUN.
Look at how AT EASE she is in the water, totally nude, probably near a semi-populated area (house in the back). Girls were still wearing full-length poodle skirts at the time this was taken- no one was naked outside and as HAPPY to be there as Bettie!
Also look at how SMALL the smallest part of her waist is, where the bottom of her ribs meet the ovals coming up off her hips- it’s nearly only the width of her face!
Don’t look at my horrible attempt to recreate it on the right.
Let’s do another:

A totally different emotion and expression here, right? But still primal and alluring. We’ll cover how to do this expression below.
My sketches are getting a little better, although my front leg is too long because I over-accounted for perspective and didn’t use a defined vanishing point. My thigh is a silly 2.5 heads long instead of just 2, and her calf is a crazy 3 heads long, just because I didn’t do perspective right.
Let’s do one more:

Yet another different expression from the first two, but still alluring, right? Maybe a little softer, little more submissive. I guess because she’s tied up. (Not a lot of models at the time were as willing to do bondage shots as Bettie!)
On the right, I finally put in a vanishing point and did perspective lines correctly this time so her proportions look better, notice how hard I’m trying to capture the ‘suck in’ from her ribs to her stomach.
And readers of this blog will know that once I get an ironic caption attached to a sketch- “Bound To Make Great Art”- get it, because she’s boun- oh don’t act like you don’t get it- once I get an ironic caption that makes ME chuckle, it’s in the bag, that’s the one we’re going to use.
So lets see what we can do with it.
STEP TWO: ITERATIONS
I spent WAY too long trying to get this pose right- like two weeks too long- it just never seemed to POP like the original:

It was the hard vanishing point and the thinking in 3D which made the final one on the right come closest to working, I think. For the first time I drew her hands as 3D rectangular shapes and her stomach as having real boxy edges and depth, the edges pointed at that vanishing point.
I don’t normally use a vanishing point in my pin-ups- I don’t do many sexy sketches of skyscrapers- but I just bought this book called “Framed Perspective, Vol. 2”, which was all about using vanishing points on human scales and it really helped me place my figures in 3D space, not just a flat plane. It’s expensive and narrow, so I wouldn’t make it the first art book you buy, but if you’re stuck on drawing flat looking humans and can’t understand why, it’s a good advanced book to spur you on: https://www.amazon.com/Framed-Perspective-Vol-Technical-Characters/dp/1624650325

And then I faced the hardest decision I had in Art yet.
I said above how none of my pencil sketches really ‘worked’ for me-
Even after two weeks, while converting my final sketch to digital, I started using the original reference photo under my sketch just to get a few of the lines right-
-and then a few more-
-and then just a little more to get this curve right-
And before I knew it I had traced the reference exactly:

And since the reference was Bettie Page, of course tracing it digitally looked really GOOD.
Look at how SOLID she looks on the far right, how THREE dimensional-
Tracing helped me get the legs right and her three-dimensionality right and especially her face and her expression right-
-but it wasn’t real.
It wasn’t my art.
I was just tracing a really good old photo one for one.
And even though it looked GREAT and I could SEE myself coloring it in and making a GREAT sticker and it solved EVERY problem I had over the last two weeks of trying to make this piece work, the HARDEST thing I’ve ever done in art-
-was completely deleting the traced layer and going back to my own 100% hand-created pencil sketch, and trying to make that work digitally, just freehand. It was like having the Holy Grail right there in your fingers, but giving it up to go hang out on the backs of camels with Gimli and James Bond. (Bing it.)
I only include this section in case there’s ONE person out there who’s facing this same temptation as me-
Exactly tracing someone else’s work or a reference photo can be VERY seductive-
After all, you’re doing all the work to make the lines right, right? And you’re doing all the digital coloring and shading and it’s ALMOST like you made the whole thing yourself-
But tracing should only be done very EARLY in your art training.
When you’re just trying to learn what shapes make up a human and what lines look like.
And NEVER passed off as your original work or sold.
And as soon as possible, you should graduate to drawing humans as simplified bowling pins and boxes and tubes with circles for joints like a wooden dummy, no matter how BAD it looks and how much your proportions SUCK and how STIFF your poses are-
-because you have to be suck at something before you can be good at it.
And those bowling pins and boxes and joints form the FOUNDATION of every pin-up pose and gesture and flow you’re going to draw from here on out, every art decision you’re going to make, so they’re worth studying. Resist the urge to trace.
Because the real art is MAKING all those minute decisions with your free hand and free mind. Of choosing HOW to represent what you see in the real world on paper. It’s the decisions that make your art. Don’t use someone else’s. Don’t fall into the same trap I almost did. No matter what you draw, make sure it’s your own.
And call your mother. Not about this, obviously. But if you still have one, she’d probably like to hear from you more than you currently are.
Sermon over, and anyway eventually I got to this, which I was happy with:

It’s not as solid as the traced image, but it’s all my work. And I can live with that.
Hey, do you guys ever want to see more about how I went from that reference photo to 3D bowling pins and boxes to my final blue skeleton? I feel like I already covered that in my very first blog article, but if you’re struggling with simplification and want to see me go step-by-step from a reference photo to a boxy model for your benefit (I, for one, wish Frank Cho did more of that basic construction-type tutorial on Youtube, explaining the decisions he’s making, but he’s already too advanced for me to learn from).
So if you want to see me try something like that, scribe your name with a virgin diamond stylus onto the inside of a seashell and drop it into a lake of boiling salt and it will get to me. Or you could try contacting me some other way, I guess.
Now, let’s finally get to what we’re all here for:
STEP THREE: THE EXPRESSIONS
Every expression we’re going to draw as pin-up artists will rely on us controlling basically three elements:

The nose and ears don’t change much with any emotion, which makes that easy.
And while you can ADD to emotions with the tilt of the head or the splay of the hands, those are secondary. It’s really those three elements above which carry the lion’s share of your pin-up’s expression.
And really, because most expressions are symmetrical, all you’re doing is moving each of those elements either UP or DOWN- how easy is that?
Look how much I can change by just moving the CORNERS of the mouth in and down (nothing else changed between the two below):
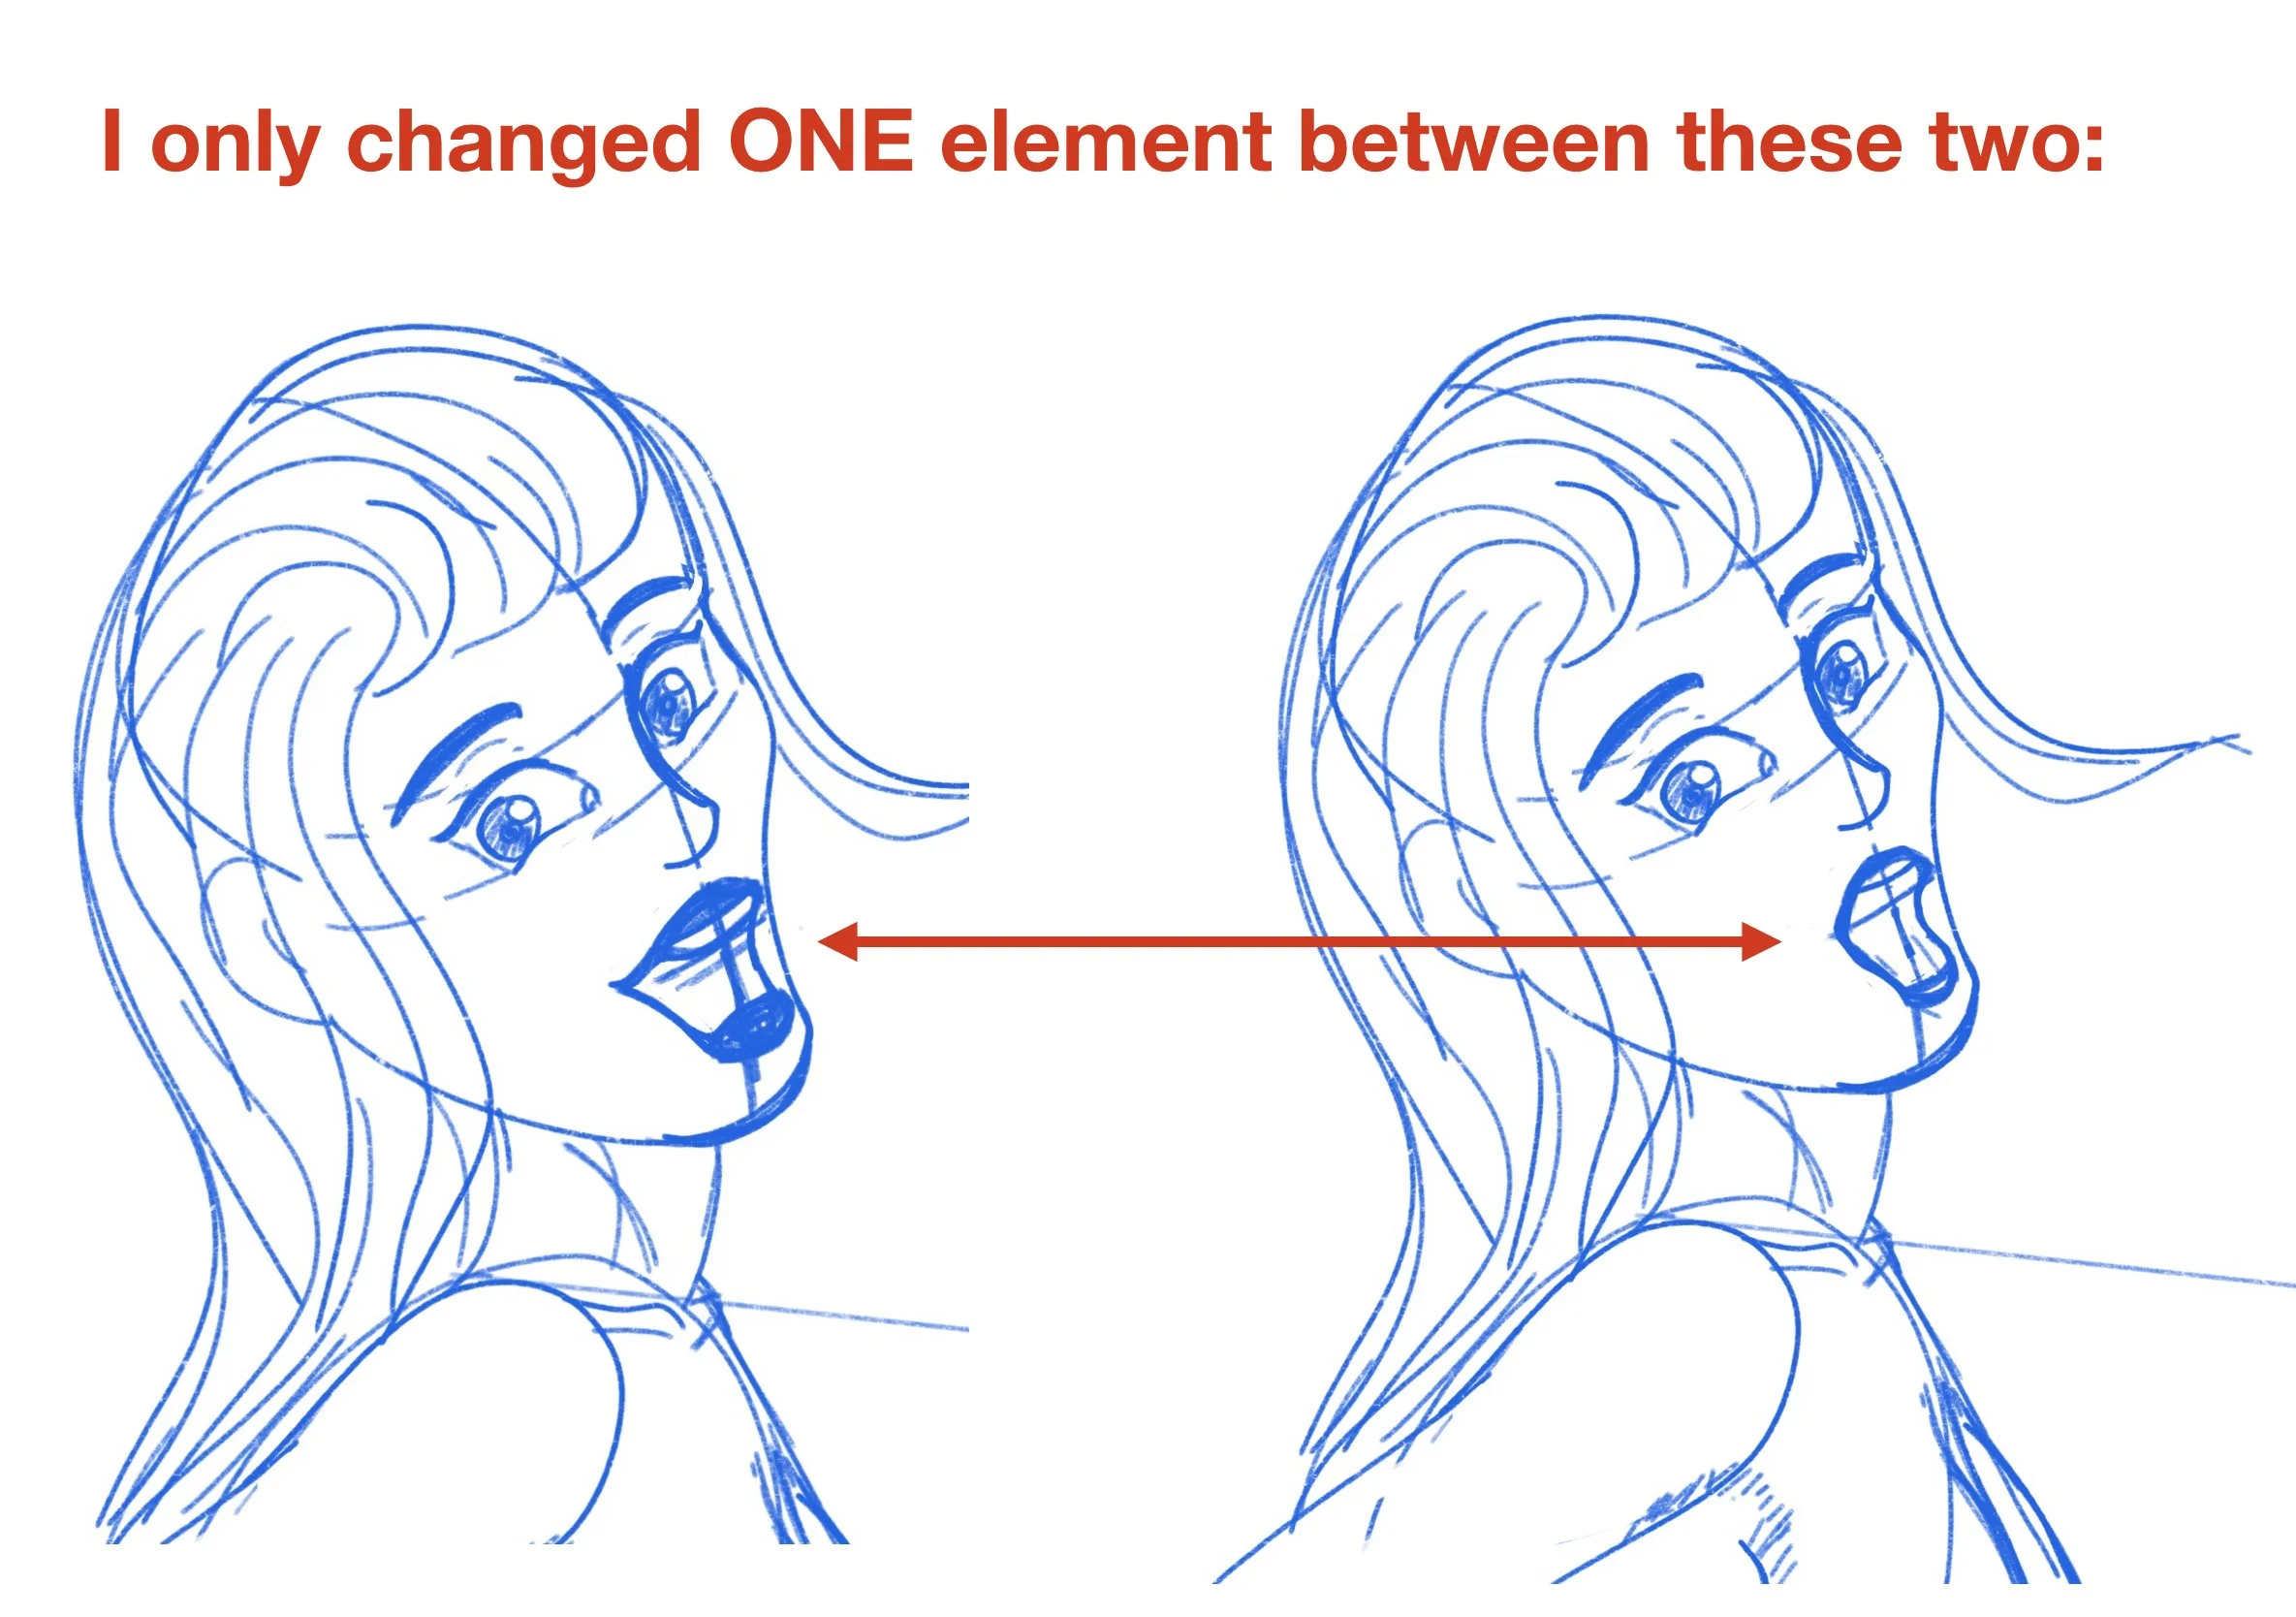
I just realized I changed the teeth line a little too, but it’s really just the CORNERS of the mouth I wanted to focus on- the expression changes from Happy to… Playfully Concerned I guess? Everything else I left the same, the eyebrows, eyelids, but just changing the length and height of the mouth line (and making the corners round, not pointing up), totally changes the emotion!
Both could be decent pin-up expressions, but for totally different situations. Just with one little move of the corner of the mouth!
Try this out on your own- copy your same blank face five times and start messing with just the SHAPE of the mouth- turning it up or down at the corners, moving the widest point of the mouth up or down (what I call the ‘mouth line’ from here on out), making the mouth shape an ‘O’ or a big Joker grin- you’ll be suprised how many different subtle expressions you can discover by changing just one element!
Then do the same with just moving the eyebrows up and down or tilting them-
Then just the upper and lower eyelids up or down-
You could spend a lifetime here!
Because there’s so much emotional change with so little ink change here, I usually keep many variations on different layers of my pin-up, especially in the early stages:

That way we can easily swap them around without messing up the base ink. I usually to do this with the eyes and sometimes the eyebrows too, but for this example I only did the mouth.
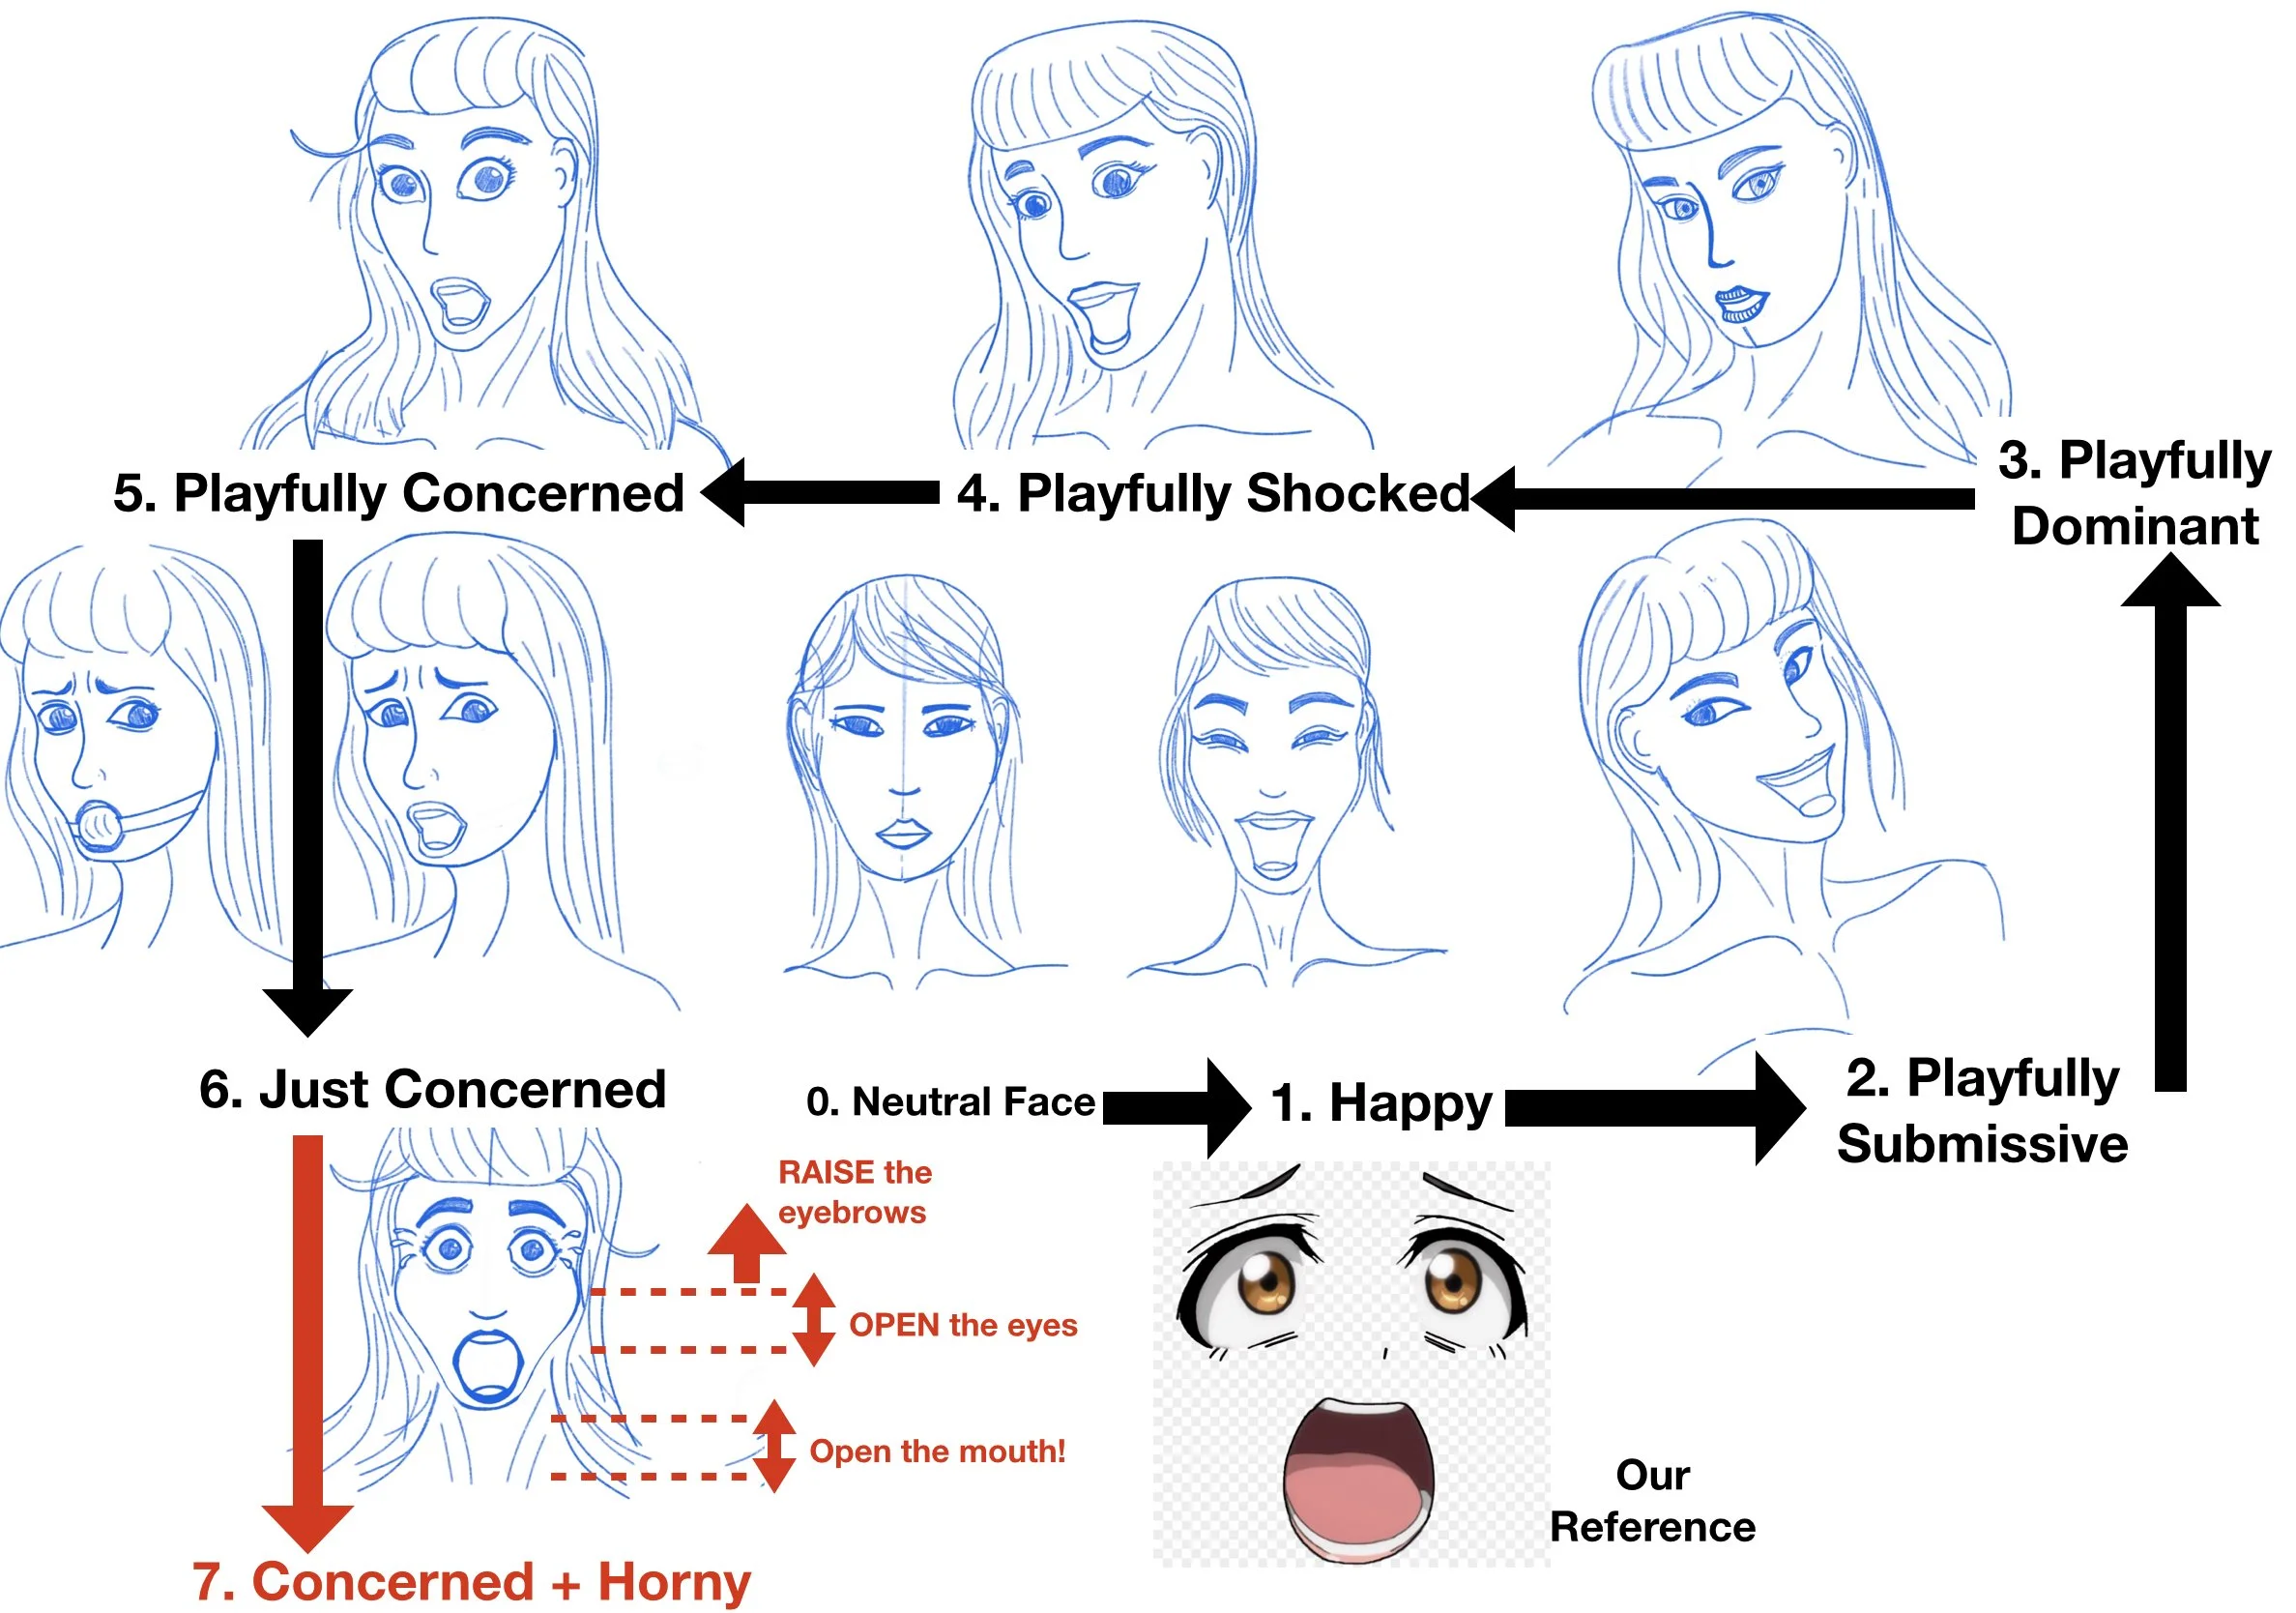
Now that we’ve got our three elements to change and the tools to layer them, let’s start with the first expression every pin-up artist should know-
Expression #1: Default Happy
Let’s see how those three elements change from a neutral face to a happy one:

Obviously never use Expression #0 in any of your pin-ups, she’s only there to provide a baseline. Blech.
BUT, to go from that neutral expression to a Happy one, notice how we are just raising each of the three elements up in space! ‘Raise raise raise’ is a simple way to remember Happy!
Obviously I’m not a master of Expressions yet-
And what I’ve drawn is no where near as good as our Bettie reference-
But here’s what I learned about Default Happy which might help you out:
Raising the LOWER EYELIDS is a very simple way to show GENUINE SMILING. If you only change the mouth, it might look dead-eyed and fake. My theory is that a real smile raises the cheeks, which squish up the normal space the bottom of the eyes would have, which make our squished lower eyes into upside down half moons. Sometimes I use just the upside down half moons and a light smirk to show smiling- it works better than you’d think!
But BE CAREFUL- even in our Bettie reference image notice that you almost can’t SEE any of her irises (colored part of the eye)! That’s how scrunched up her eyes are! If you ONLY have the half moon lines (no separation between upper and lower eyelids, no iris visible), your art will look more anime style than pin-up. Maybe that’s what you want. But I always have to fight for a little space between the upper and lower eyelids to get the irises to show in there.
Raising and curving the eyebrowns is an easy one. Delighted people raise their eyebrows. Try it in a mirror.
Raising the mouth line makes a lot of difference! Controlling the CORNERS of the mouth will come back again and again in this post, so make sure you understand what I mean here. I’m talking about the line which connects the WIDEST points of the lips, moving and pointing that line/edge up or down. This is especially tricky when the mouth is a round or surprised ‘O’- moving the mouth line down just a little can make it go from an “OH YEAH” to “OH NO” really quick! Don’t be afraid to have a few variations on different layers!
You’ll notice, in almost every reference pin-up, Bettie Page opens her mouth. There’s something about it- I don’t know the evolutionary reason why- but a woman slightly opening her mouth instantly makes the image more seductive and alluring and primal, so you’ll see me do that in every expression here. This expression might work with the mouth closed, but you’ll have to try it and let me know because it’s opened mouth for me from here on out.
I’d use this expression as my default happy/delighted/eager-to-be-there face for almost any pin-up situation where the woman is not badly surprised.
Okay, let’s move on to:
Expression #2: Playfully Submissive

All I did here was open up those squished half moon eyes, mainly by moving the top eyelid!
I left the eyebrows and mouth basically the same- I had to change the angle of the head because our Bettie reference changed, but in my mind, expression #1 is a “Ha ha!” and #2 is an “Ohh, you!” Am I crazy, or do others see that?
In the reference image, the same one where she’s tied up, it’s more of a playful “Oh you…!” look, because of the tilt of the head and her semi-submissive bondage pose. I didn’t get it perfectly right, there’s always more to learn with expressions.
This is a good expression if the man is offering the woman one more drink in a “Baby It’s Cold Outside” way.
Let’s move up the grid to:
Expression #3: Playfully Dominant

Just as we raised everything to get to default happy, here we’re lowering everything to get a more serious and dominant look.
Specifically, lowering the top eyelids into ‘hooded eyes’ is key to getting what I call a “Hunter look”. You can see it better in the reference.
We mentioned that the best Bettie shots always have her mouth open but this expression is probably the smallest mouth opening we’ll have in this entire grid. Just a slight opening will do, because she’s not shocked or super happy, she’s serious. But notice the mouth never fully closes.
Finally, try this in front of a mirror, do expression #2 the playful “Ohhh You!” and then transition to the #3 ‘Hunter look’, and back again. You’ll FEEL everything, especially the corners of your mouth, drop. FEELING that change over and over is how you really internalize what’s going on here. Not enough artists use their own faces in a mirror as references when they can’t find the perfect reference in between all the fake AI images on Pinterest.
I would use this type of expression anytime your pin-up is wearing leather or holding a whip or in thigh high boots, the lower you make her upper eyelids the more annoyed she is with her subject.
We’re temporarily leaving the “Playful” side of the grid now, moving more towards the “Shocked” side. Playful and Shocked may not be perfect opposites, but I had to arrange this grid somehow, and this way almost made sense.
I don’t do straight up Angry or Annoyed pin-ups (that seems against the pin-up code), so those are the best opposites we got.
If you haven’t caught on yet, the point of the grid is that you can ‘walk’ to any expression from the next door one, just by changing what is highlighted in red. It works both forwards and back (you can go from #3 Hunter to #2 Submissive by raising the top eyelids, for example), and the way I’d use it starting out, is to start from a default neutral expression in your initial blocking sketch, and then choosing a direction to walk.
You can also do a first draft with a proto-expression (even an emoji next to your head sketch will do- I do emojis all the time!), find the closest expression on the grid, and then figure out if you want to ‘push’ any of the three elements a little bit in any direction.
I find the hardest ones are balancing a playfully shocked expression vs. “AHHHHHHHH I’M BEING EATEN BY A SPIDER”, which is probably one you want to stay away from. But that’s the side of the grid we’re heading towards now. Watch out for spiders.
On that note, let’s go from Playfully Dominant to Playfully Shocked by just opening the mouth and raising the eyes:
Expression #4: Playfully Shocked

Notice how we could have also gone from #1 Happy up to #4 Playfully Shocked basically by opening the eyes. That’s the power of this grid, you can use it like a map to navigate where you want to go, starting from anywhere! I wish I had had something like this, starting out.
#4 Playfully Shocked might seem very similar to #2 Playfully Submissive, with the same mouth, the same raised eyebrows, but the big difference in showing more shock is the WHITE SPACE between the iris and the TOP eyelid:

That might be a big ‘no duh’ to everyone reading, but it took me a lot of time to figure that out. Most of the time in a resting face, the top eyelid is covering at least some of the top of the circular colored iris, and the bottom eyelid just barely touches the bottom of the iris.
After LOTS of failures, I’ve finally learned that to show SHOCK or even shocked DELIGHT, I have to fight to get that WHITE SPACE between the iris and the top eyelid. It’s harder in a pencil sketch because there’s only so thin your pencil can get, I find it a little easier in digital, because you can really zoom in and use a small brush, to fight for that white space.
But yeah, that white space = shock.
It therefore follows that if you want to show even MORE shock and surprise, you simply increase that whitespace:
Expression #5: Playfully Concerned

And all we did was raise her upper eyelids for more white space!
And drop the mouth line the less happy she gets, although you have to be very careful with that.
She’s obviously more concerned than #4, but she’s not outright freaking out (aka ‘being eaten by spiders’), so I still classify this as “Playful”. The top row is the “Playful” row of the grid, if you can’t tell.
This is a great expression for “Ooops what sort of pickle have I gotten into now?!” pinups, a la the huge slew of silly Art Frahm style “oh no my panties suddenly fell down for some reason” 1950s art I talked about in my first blog post.
Let’s leave the Playful row of the grid now and go down to:
Expression #6: Just Concerned

I had to draw this one twice because of the gag in the reference image, just to extrapolate what her mouth might look like, but I learned that what REALLY makes this expression work is the concerned pushing IN of the inner eyebrows!
This is the first time we’re moving something side to side instead of up and down-
Play with your eyebrows in a mirror and you can see that most people can mostly move the INNER part of their brows, the part nearest the nose-
The outer TIPS of the eyebrows only change location a little in most expressions, they might go up or down HALF of what the inner eyebrow tips can-
I can’t even make the expression I’m drawing here, but that’s the magic of art vs. reality-
So here we’ve lowered the eyebrows as a whole but have pushed IN the inner centers a LOT, into very cute concerned little ski jumps on either side!
On the left hand image I also played with little worry lines under the eyes, basically the lower eyelid tubes, but you can leave those out if it makes your model look too old/wrinkly. (The more ink lines you put on a face the older it looks, even if you see those lines in real life.)
The non-gagged mouth is the same mouth from expression #5, that’s the benefit of ‘walking around’ the grid, you can reuse a lot of adjacent elements!
This is probably as worried as I’d ever go in a non-furry non-bondage pin-up, you can see in the reference she’s more cutely worried than terrified, but if you’re drawing straight up bondage maybe you increase the worry even more. (More ski jump eyebrows and lower mouth line, if you’re wondering.)
But going down from Playfully Concerned to Just Concerned, we’re now going further down to a totally different corner of our grid, which is:
Expression #7: Concerned + Horny
I get that the “Horny” part of this expression is hard to see right now- it will make more sense when you have expression #8 to compare it to.
But if it helps, this is what I call a “12 inches of sausage into a 6 inch bun” look. If you haven’t seen it before, you might need to watch a few more short adult instructional videos online. It’s everywhere there.
Unfortunately there’s no Bettie Page reference for this- these kind of post-modern expressions didn’t exist back when she was modeling (no one had sex back then)- but you see it a lot in hentai, and on DeviantArt, and it’s a good expression to have in your quiver, if you ever need your models to quiver.
I’ll probably never use this expression in a real pin-up, it might be a little too suggestive of big trains going into small tunnels, but it’s still instructive to see how expression #6 is in a little valley between two high eyebrowed, wide-eyed type expressions, and how close playfully surprised and badly surprised are. The mouth line is lower here (to show badly surprised).
I also cutely mussed up her hair a little here. Besides our three elements, you can also use hair to show the emotional state of a model, mainly whether she is put together or out of sorts. In pin-ups where we can always control the hair, I always use hair to show SOMETHING about the state of the model, whether it’s bouncy or messy or severe. Hair should always add to the emotion. I love it in anime where a girl gets surprised and her hair sticks straight up, but that’s maybe a little too cartoony for my work.
Okay, so if in going to the right from #0 Neutral to #1 Happy, we closed the eyes to express delight, what if now moving to the right again, we closed the eyes again, combining the delighted eyes from #1 with the horny of #7 and raised that mouth line to get-
Expression #8: Just Straight Up Horny

So now #7 makes a lot more sense, right? You can see how #8 can jump easily to #7, based on the size of the train going into the tunnel?
This is another one with no Bettie reference, no one was doing ahegao face back in the 1960s. (Although it might have been a better era if they did. Can you imagine a presidential portrait of President Nixon doing ahegao? Now you can’t NOT imagine it, right? You’ve just been Dick-rolled.)
Now this grid isn’t perfect, it should probably look more like a perodic table, with some gaps, and different rows and columns more strongly tied to a single element, but I’m no Meendeleev, so you get a square grid. But I hope you can see that, by taking the mouth from #1, the ski jump eyebrows from #6, and slightly scrunching the eyes from #7 like they were halfway to #1, you can get expression #8, which I call Just Straight-Up Horny.
I also crossed the eyes. Classic ahegao.
I hope you can imagine a set of panels where the woman is enjoying things, so she’s a #8, but then something happens (the tentacle gets too big or whatever) and she quickly transitions to a #7, depending on her surprise?
That’s why I put these two expressions close together- depending on how fast the washing machine she’s sitting on spins, a woman might jump between #8 and #7 and back very easily!
I also put in a wide-eyed version of #8, and a tongue-out version, I don’t know your sitch, so I don’t know which one you’ll need. Every change serves a slightly different idea. Ahegao is like an onion.
Also notice that in travelling from #4 Playfully Shocked to #5 Playfully Concerned, the mouth line dropped as she got more worried. And so now, travelling the opposite way, from #7 to #8, the mouth line now RISES, to indicate she is LESS concerned.
Maybe this post will get that Nobel Prize after all.
Let’s do the last one:
Expression #9: Playful + Horny
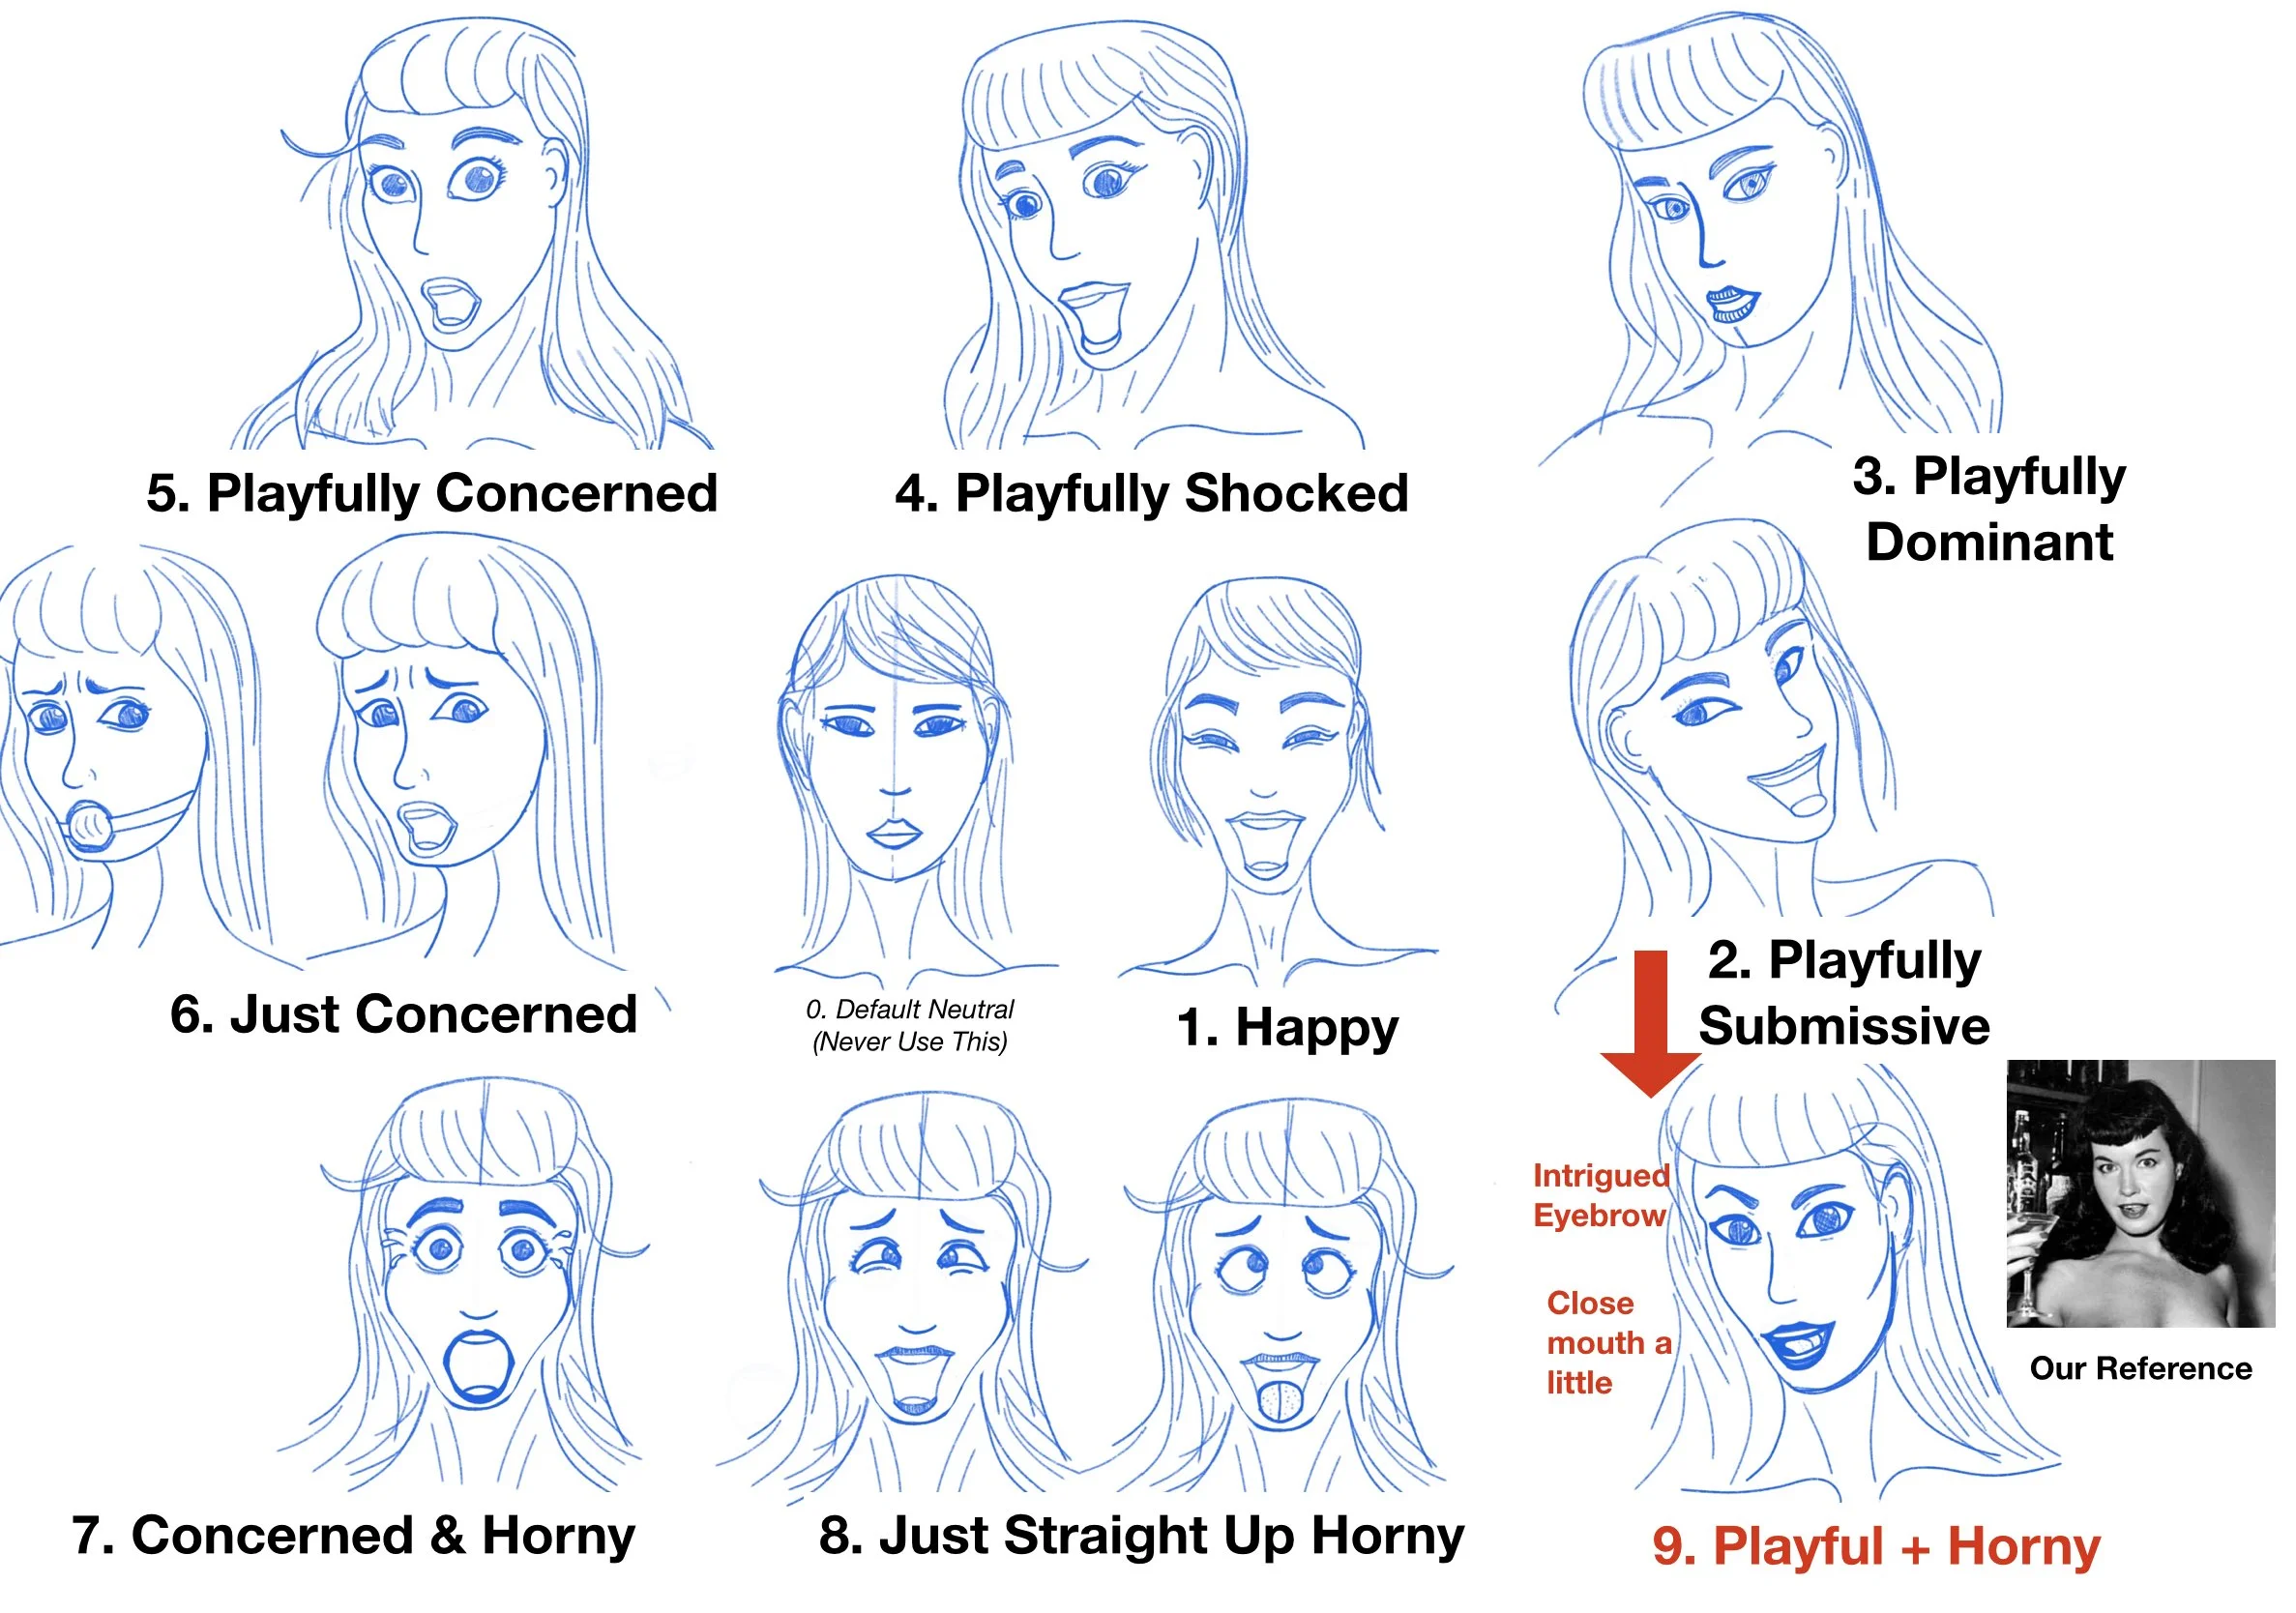
Breaking with tradition, it’s easier to come down from #2 Playfully Submissive to get to #9 Playful + Horny. Basically you take the “Ohh You!” expression of #2 and close the mouth a little, raise an eyebrow, and you get an “ohhhhh youuuuu….” Look at that reference image- she’s about to pounce.
I would use this expression in any kind of “Huntress” or “Tigress” situation, where she’s more pleased and horny with her subject than #3 “Playfully Dominant”. But notice how it’s different from #3- mostly in the height of the mouth line! Such a little thing makes so much difference!
That’s probably the biggest thing I learned, making this grid. And you should make a grid for your most used expressions as well, sorting them in a way that makes sense to you- you’ll learn a lot just by having to sort expressions in some sort of logical order!
Anyway, that’s our grid. It’s not perfect. I’m not perfect, drawing facial expressions, but hopefully this helps newbie pin-up artists get a better map of emotions they can have their girls make, for more expressive pin-up art!
I know I learned a lot making it. Particularly, the #3-4-5 chain shows a strong trend I can recognize, the #7-8 flip is useful, and I’m excited to use #3-2-9 in my work, since most of what I’ve drawn is #1 or #4, and I’m eager to branch out! Let’s finish this thing.
Finishing This Thing
After doing all those expressions above I inked and shaded my original piece just like I taught you in my previous blog posts, to finally end up at something like this:

Yes I changed the caption; this is funnier.
And notice how much you can change just by changing the mouth:

That’s one for if you don’t want to look at nipples, and like even worse puns.
Both are available for purchase in my sticker shop now, or anywhere mildly suggestive instructional pin-up art is sold!
Anyway, hope that helped, keep practicing and getting better, and if you discover any expression tips, hit me up via email or on reddit, or if you want to suggest a future blog topic!
And FYI, Bettie got those bangs because her first photographer, an off-duty cop, suggested them, because he said it would help reduce the glare coming off her forehead from his flash bulb. Bettie’s second and more famous photographer, a smart woman and good pin-up model in her own right, Bunny Yeager, didn’t have that problem, and produced most of the great Bettie shots that you probably know and love! Make sure to read more about this American legend!
Hope this helped your pin-ups improve!